Deployment
Repository
Git
Concepts
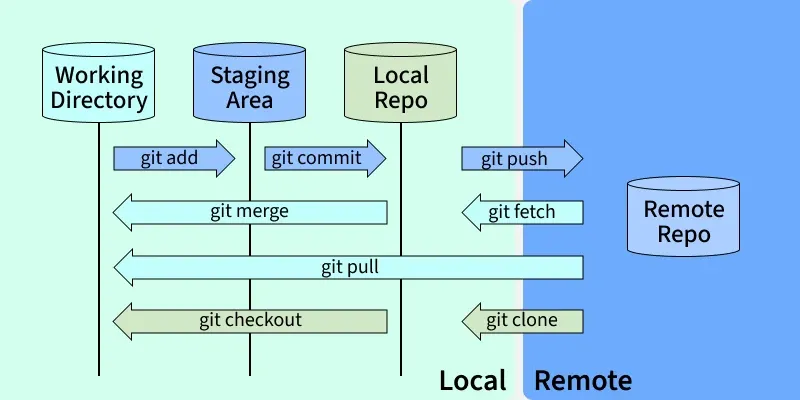
- Working tree/ Working directory: The actual files you edit on disk.
-
Staging area/ Index: A snapshot of what will go into the next commit.
The staging area and ‘git add’ command let user picak which changes belong together instead of commiting all the changes at once every time, allowing fine-grained, locgial history.
- Repository/ Head: The series of commits that make up the project history.
commands
-
git clone ‘remote repository web URL’
clone the remote repository (only the default branch, main/master)
-
git branch
get the list of local branches
-
git branch -r
get the list of remote branches
-
git checkout -b ‘new-local-branch-name’ origin/’remote-branch-name’
pull a new remote branch
-
git checkout ‘local-branch-name’
switch to a branch already existed locally
-
git pull
fetch and merge changes from the remote branch that your current local branch is tracking
-
git checkout -b ‘new-local-branch-name’
create a new local branch
-
git branch -d ‘local-branch-name’
delete the local branch
-
git push origin –delete ‘remote-branch-name’
delete the remote branch
-
git add .
add all modifications from working directory to staging area
-
git commit -m “”
commit with message “”
-
git push origin
push your current branch to the remote
-
git status
get the current branch and commits
-
du -sh .git
show the git storage occupation.
-
git count-objects -v
show the detail information of git objectives.
-
create a .gitignore file in the project folder.
Write ‘*.csv’ in it to ignore all the csv files.
Understanding Git-Ignore and Its Usage
Geeksforgeeks Naming Conventions for Git Branches
Practice
- merge a feature branch to main branch manually
- git pull: This fetches changes from the remote and merges them into your current branch
- git checkout main: You switch to the main branch.
- git merge feature: This merges the local feature branch into your main branch.
- git push: Finally, you push your local main branch to the remote.
- Pull Request (PR): a request to merge one branch (usually a feature branch) into another branch (usually main or master) in a remote repository.
- copy a github repository to the team project repository
- cd ‘local code folder’
- git clone: clone the github repository to local environment
- git clone: clone the team project repository to local environment
- cd ‘local team project repository folder’
- (git checkout -b ‘new-local-branch-name’: create a new local branch if needed)
- copy all the files in the local github repository to the local team project repository manually
- git add .
- git commit -m “”
- git push origin
- Handling a conflict
- commit
- git add .
- git commit -m “my local edits”
- git pull (–rebase)
- git push
- stash
- git stash
- git pull (–rebase)
- git stash pop
- git add .
- git commit -m “my local edits”
- git push
- Adding –rebase keeps the commit graph linear and makes it easier to read or it would be a Y-shaped history using pull/merge.
- Using git pull to handling conflicts need to commit first. Becasuse the merge algorithm works only on commits (snapshots). Or using stash to hide the changes and bring it back after pulling.
- commit
- Handling data files
- Avoiding this: add .gitignore by default
-
.gitignore:
*.csv
*.png
*.jpg
*.log
*.DS_Store
-
- If really happened:
- Adding *.csv to .gitignore won’t delete the CSVs you already pushed and won’t make the repo smaller.
- To remove them from the current branch, run git rm –cached, commit, and ‘git push –force’.
- Even if those large files only exist in the master branch and master branch is the only branch, gitignore them won’t delete them permanently and makes the repo smaller. Because git is designed to never lose any data and deleting files afterwards won’t change the history.
- Avoiding this: add .gitignore by default
Environment
Anaconda
-
conda create -n ‘env_name’ python==’python_version’
create a new environment
-
conda activate ‘env_name’
-
conda info –envs
list all environments and locations
-
conda list
list installed packages
-
conda remove –name ‘env_name’ –all
delete environment by name
-
conda config –show-sources
view channel sources
-
conda config –remove-key channels
remove all channel sources
-
conda config –remove-key channels
remove all channel sources
-
conda config –add channels ‘channel_name’
add the aliyun channel sources:
conda config –add channels https://mirrors.aliyun.com/anaconda/pkgs/main
conda config –add channels https://mirrors.aliyun.com/anaconda/pkgs/r
conda config –add channels https://mirrors.aliyun.com/anaconda/pkgs/msys2
other sources:
mirrors.ustc.edu.cn
mirrors.bfsu.edu.cn
mirrors.tuna.tsinghua.edu.cn
-
The structure:
~/anaconda3/envs/my_env/bin/python the currently active Python interpreter
~/anaconda3/envs/my_env/lib/python3.x/site-packages/ pip downloads the wheels and extracts the package files directly into this path
-
Conda “owns” the environment, but pip populated it. Virtual environments are designed to be isolated, so the package downloaded by pip in one environment can not be used in another environment.
Pip
-
pip install -e .[extra]
installing the current project as a package in editable mode of pip.
extra could be torch or some other packages need to be installed.
If you ran uv pip install -e ., a tiny link is placed in the Site-Packages folder that points back to your Project Folder.
-
pyproject.toml :
the modern standard for configuring Python projects, designed to replace the older, fragmented system of using multiple files like setup.py, setup.cfg, requirements.txt, and MANIFEST.in.
When you ran pip install -e .[torch], pip looked into the [project.optional-dependencies] section of your pyproject.toml, found the list of packages associated with torch, and installed them along with your local code.
-
Do not use ‘sudo pip install’ at anytime. It can result in broken permissions and conflicting behaviour.
-
create a environment to fullfill the requirement of a github repository
- conda create -n ‘env_name’ python==’python_version’
- conda activate ‘env_name’
- pip install -r requirements.txt
uv
-
a single tool that replaces pip, pip-tools, venv, pyenv, and poetry all at once. uv is often 10x to 100x faster than pip
-
uv venv:
Create a virtual environment
-
source .venv/bin/activate:
Activate the environment
-
uv pip install :
install the package
Nvidia
-
nvidia-smi
Shows a summary table with:
GPU index, name, and UUID
Driver & CUDA versions
GPU & memory utilization
Power consumption and temperature
Active processes using the GPU
-
watch -n 1 nvidia-smi
looping
Packages
Python
Torch
- pip install torch==’torch_version’+cu’cuda_version’ the cuda_version here should be smaller than the cuda version got by ‘nvidia-smi’
Transformers
- Download and save LLMs on Hugging Face
- pip install transformers
- pip install torch
-
run this python script
from transformers import LlamaModel, LlamaTokenizer model = LlamaModel.from_pretrained('huggyllama/llama-7b') tokenizer = LlamaTokenizer.from_pretrained('huggyllama/llama-7b') model.save_pretrained('./llama-7b') tokenizer.save_pretrained('./llama-7b') -
next time you can load from local folder
from transformers import LlamaModel, LlamaTokenizer
model = LlamaModel.from_pretrained('./llama-7b')
tokenizer = LlamaTokenizer.from_pretrained('./llama-7b')